What Are Will Continuation Sheets Used for
This chapter is from the book
Preparing the Continuation Sheet and Deposit Copies
Once you've completed Form VA, which provides general information about the group of images you're registering, it's time to provide some more specific information about each of the images, which is where the continuation sheet comes in. Copyright Office regulations require that you provide the date of publication for each photograph included in the group, and the continuation sheet is one way to do that. Strictly speaking, the continuation sheet is one of several ways to provide the publication dates (the other options are to include the date on each image itself or on a hardcopy or text file list that is submitted with the images).
The information you provide on the continuation sheet will become part of the registration certificate so that anyone looking at the certificate itself—like a court in the case of an infringement lawsuit—can tell, by title at least, which images are part of the registration. Putting the dates of publication on the images themselves will also help tie together the deposit and the certificate, creating a more complete public record. For that reason, I strongly recommend both submitting the continuation sheet and including additional information on the face of the image itself, as I discuss in this section.
The continuation sheet
Completing the continuation sheet (shown in Figure 4.6) is pretty straightforward:
-
In space A, provide the name of the author and the name of the copyright claimant as they appear on Form VA.
It's very important that the information you provide in this section matches exactly the information you provide on Form VA.
-
Space B is where you briefly describe each photograph, including the date of publication. Number each image in your filing sequentially in the Number box. For each image, you have to provide the title and the date and nation of first publication. You may also provide a brief description, but that's not required.
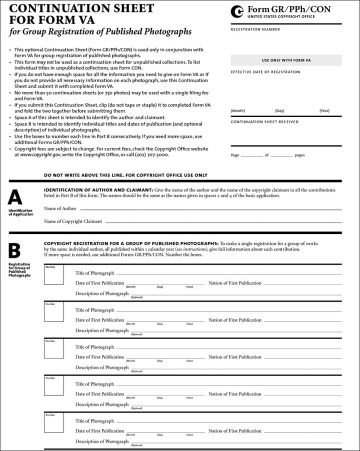
Figure 4.6 Form GR/PPh/CON (also known as the continuation sheet).
Typically I use the filename as the title, but if you usually give your images unique titles, feel free to use those. What's important is that the title is descriptive enough that you can identify later which image it's referring to. It's also important that the title you provide on the continuation sheet is the same as the title you provide on the deposit copy itself (see the next section), which is why I find using the filename to be the best approach.
Each continuation sheet contains space for 15 images. If you have more than that, use additional sheets of paper, but continue numbering sequentially (that is, the first number on your second continuation sheet would be 16).
- In space C, provide the address where you want the Copyright Office to mail the certificate. It may seem redundant to have to do this on Form VA as well as on each continuation sheet, but it helps ensure that none of the pages gets separated (and if they do, it makes it easier to track down the rest of the application).
Once you're finished with the continuation sheets, it's time to create the deposit copies of each image that's part of the group.
Deposit copies
Preparing the deposit copies is fairly straightforward, especially if you're using Adobe Lightroom, because you can partially automate the process using export presets and an inexpensive plugin called LR/Mogrify 2, which is available from www.photographers-toolbox.com. You can download a trial version of the software for free, but it's limited to exporting only ten images at a time. You can unlock the full version of the software by making a small donation (any amount that you choose) to the software developers.
After you've installed LR/Mogrify 2, you can easily produce deposit images with the following steps:
-
In Lightroom, select one image from the group that you're registering. With that image selected, from the File menu, choose Export.
The Export One File dialog box (shown in Figure 4.8) appears.
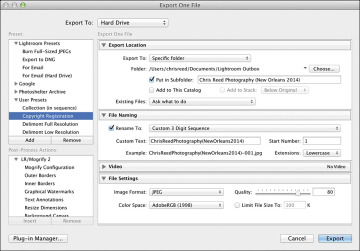
Figure 4.8 The Export One File dialog box in Lightroom.
-
In the Export Location panel of the Export One File dialog box, designate a location on your computer to store the deposited images.
I have a master folder called "Lightroom Outbox" that I use to stage output from Lightroom, and inside of that I have Lightroom create separate folders for each export. You can do this by checking the Put in Subfolder box and then giving the folder a name.
As shown in Figure 4.9, the name of the folder is the title from my registration application, "Chris Reed Photography (New Orleans 2014)." You can call the folder whatever you want (it really doesn't matter for copyright registration purposes). Just be sure to remember where your images are going to be saved so you can find them again later.
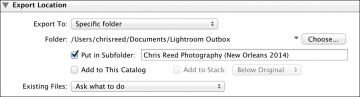
Figure 4.9 Tell Lightroom where to save your finished files.
-
In the File Naming panel of the Export One File dialog box, check the Rename To box and select Edit from the drop-down list (see Figure 4.10).
The Filename Template Editor dialog box (shown in Figure 4.11) appears.
-
In the Filename Template Editor dialog box, select Custom Name – Sequence from the Preset drop-down list. In the text field, you should have a template filename that says "Custom Text – Sequence # (1)," which is a great start, but you need to make one adjustment: Delete the "Sequence # (1)" part. Then under the "Sequence and Date" heading, select Sequence # (001) (see Figure 4.12) from the top drop-down list, and click Insert.
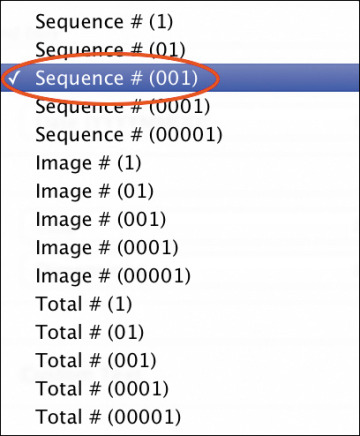
Figure 4.12 Select Sequence # (001) from the drop-down list.
This will add a sequence variable to the template filename, but with placeholders for three digits, which will help keep your images organized properly. When you're finished, go back up to the Preset drop-down list at the top of the dialog box, select Save Current Settings as New Preset, and give the filename preset a name. You can call it whatever you like, but I decided to call it Custom 3 Digit Sequence.
When you're finished, click Done.
-
Back in the File Naming panel of the Export One File dialog box, in the Custom Text field, type the name of your group but without spaces (some computer systems still have difficulty parsing filenames with spaces).
In my example, it's "ChrisReedPhotography(NewOrleans2014)," as shown in Figure 4.13.
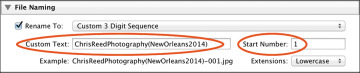
Figure 4.13 Use the name of your group registration as the filename (without spaces) and start the numbering at 1.
Make sure the Start Number is set to 1. The idea is to output a batch of images that are numbered sequentially and that relate to the image descriptions that you provided on the continuation sheet in the last part of this chapter. See the Caution note on page 84 for circumstances in which you'll want to change this number.
-
In the File Settings panel of the dialog box, set the image format to JPEG and the quality to 80.
There is no need to limit the file size, and the color space isn't important for copyright registration purposes.
-
In the Image Sizing panel of the dialog box, check the Resize to Fit box and select Long Edge from the drop-down list. Set the sizing parameter to 1000 pixels and a resolution of 240 pixels per inch (see Figure 4.14).
-
Now find the list of post-process actions in the lower-left corner of the Export One File dialog box. You should see a list of options under LR/Mogrify 2, as shown in Figure 4.15 (you may need to expand this list by clicking the arrow on the left).
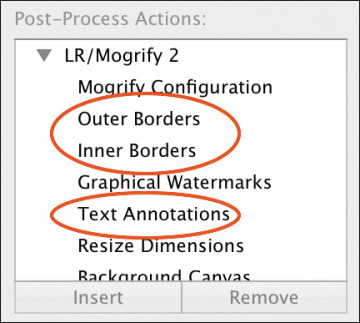
Figure 4.15 Activate the LR/Mogrify plug-in by selecting the actions shown here.
Select Outer Borders and click Insert; select Inner Borders and click Insert; and finally, select Text Annotations and click Insert.
You should now see three additional panels in the list of export options on the right side: Mogrify Outer Border Options, Mogrify Inner Border Options, and Mogrify Text Annotations.
-
In the Mogrify Outer Border Options panel (shown in Figure 4.16), click the + button to add an outer border. Uncheck the "Identical borders" box and make sure that all the drop-down lists are set to Pixels. Then type 30 for the left and right sides, and 50 for the top and bottom. If it isn't already set, change the border color to black by clicking the color swatch (mine defaults to black, so I don't usually need to do anything to the color).
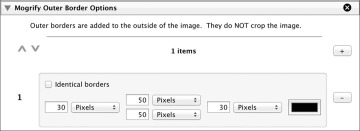
Figure 4.16 Set the outer border options as shown here.
-
Now switch to the Mogrify Inner Border Options panel (shown in Figure 4.17), and click the + button to add an inner border. This time, make sure the "Identical borders" box is checked and that all the drop-down boxes are set to Pixels. Now set the inset to 0 and the size to 1. The color should be set to white (again, the default for me, so you may not need to change it), and set the opacity to 100%.
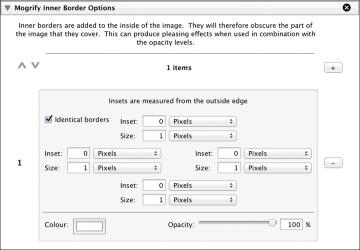
Figure 4.17 Set the inner border options as shown here.
-
Now switch to the Mogrify Text Annotations panel (shown in Figure 4.18). Uncheck the "Add annotation before outer borders are applied" box. Next to the Font name field, click Choose. This part is a little odd—instead of giving you a list of installed fonts, it provides a list of the raw font files in your system fonts directory. Select a simple font—I usually go with Myriad because it ships with Adobe products and it's nice and legible.
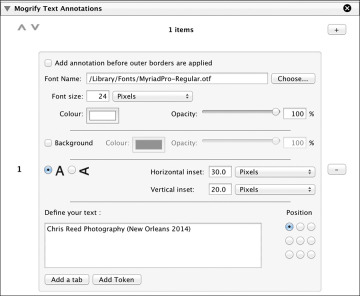
Figure 4.18 Set the text annotation options as shown here.
Set the font size to 24 pixels, the color to white, and the opacity to 100% (again, all defaults for me, but if they aren't for you, go ahead and make the change). Set the font orientation to horizontal (the radio button with the letter A not on its side), the horizontal inset to 30 pixels, and the vertical inset to 20 pixels.
-
In the "Define your text" field, write the name of your group registration.
Again, in this example it's "Chris Reed Photography (New Orleans 2014)," which is consistent with the filename I selected and what I wrote on the application form.
Select the text position radio button to place the text in the upper-left corner of the image (refer to Figure 4.18).
- At the top of the Mogrify Text Annotations panel, click the + button to add another text field. You see everything you just typed disappear, but don't worry—it's still there. Use the arrow icons on the left side of the panel to switch between text fields (refer to Figure 4.18).
- In the new text field, apply the same settings as in the first text field (from Steps 11–12) except change the vertical inset to 15 pixels and change the text position radio button to place the text in the lower-left corner of the image.
-
Under the "Define your text" field, click Add Token (see Figure 4.19). The Select a Token dialog box appears. From the Basic Tokens drop-down list (see Figure 4.20), select "Leaf name of EXPORTED file."
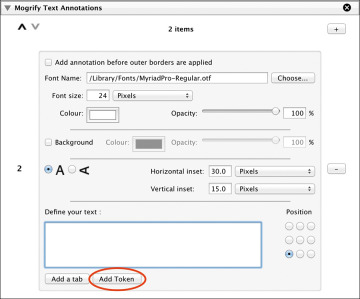
Figure 4.19 Click Add Token under the "Define your text" field as shown here.

Figure 4.20 Select "Leaf name of EXPORTED file" from the Basic Tokens drop-down list.
You're taken back to the Mogrify Text Annotations panel and the variable {exportedName} is added to the text field.
-
Click the + button in the upper-right corner of the Mogrify Text Annotations panel to add one more text field to your images. Apply the same settings as in Steps 11–12, except change the text position radio button so that the text will appear in the lower-right corner of the image. In the "Define your text" field, type "Date of first publication: [date]" where you insert the date the image(s) were published (see Figure 4.21).

Figure 4.21 Set the first text annotation as shown here.
-
When you're finished, save your export settings as a preset by clicking the Add button at the bottom of the Preset box (see Figure 4.22). Give your preset a name (I called mine "Copyright Registration") and click Create (see Figure 4.23).
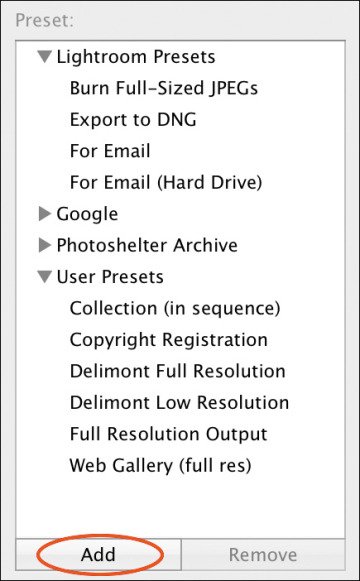
Figure 4.22 Save your preset so you don't have to go through all this setup work again!
Now for future registrations all you'll have to do is update a few fields (the name of the group of the images, the date of first publication, and the folder where you want Lightroom to save your images).
-
Click Export to export the image you selected in Step 1 (it'll be in the folder you picked in Step 2). You should end up with an image that looks similar to the one shown in Figure 4.24. If you don't, go back and retrace the steps in this section. If it worked, you can go ahead and delete the image because it was just a test.
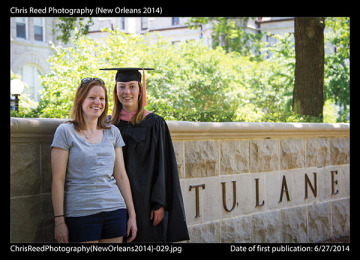
Figure 4.24 Your export preset should create an image that looks similar to this, with a black border and the text annotations as shown here.
-
Now that you've saved and tested the preset, it's finally time to export your images. Select the first batch of images from your group that were published on the same day.
It may be one image, or it may be multiple images, but the key here is to make sure that all the images you select were published on the same date. Once you've made your selection, select Export from the File menu within Lightroom to launch the Export dialog box.
-
In the Export dialog box, select the preset that you created in Step 17 and scroll down to the Mogrify Text Attributes panel. Make sure the name of the group is still accurate, and then use the arrow icons on the left side of the panel to cycle through the other text elements until you get to the one you created in Step 16 (the one where you typed "Date of first publication"). Change the date here to reflect the date that the images selected in Step 19 were published (see Figure 4.25). Click Export.
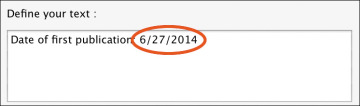
Figure 4.25 Change the date as shown here to reflect the date of publication for the images you select. In this example, the images were published on June 27, 2014.
-
Repeat Steps 19 and 20 for each subset of images within your group—that is, select the next batch of images within the group that were published on the same day (Step 19) and change the text annotation so that the date is properly rendered on the exported images (Step 20).
Be sure to also change the sequence start number (see Step 5) for each export so that you don't overwrite any files. For example, if your first subset contains 25 images, when you repeat the process for the next subset, you'll want to change that Start Number in the File Naming panel to 26.
-
When you're finished exporting all your images, check the folder where Lightroom has saved the files, and check the file count.
You want to make sure that the total number of files there is the same as the number of images you provided in the Previous or Alternative Title field (see "Space 1," earlier in this chapter). The Copyright Office will look to make sure that your deposit copies match the information provided on the application, and submitting an incomplete deposit is a quick way to have your application rejected, so it pays to take the time now to get it right. You should also make sure that the filenames match the titles you provided on the continuation sheet, and that the numbers on the continuation sheet (the ones on the left side of the form) match the sequence numbers on the files you just exported.
- Once you're finished exporting the files, burn them to a CD or DVD so you can send them to the Copyright Office with your deposit. Then, on the label-side of the disc, write your name, address, and phone number; the title of the group of images; and the number of images in the group.
Source: https://www.peachpit.com/articles/article.aspx?p=2257534&seqNum=3
0 Response to "What Are Will Continuation Sheets Used for"
Postar um comentário